.png)
by Martin Brechbiel
All photos by author
Adapted from Scale Rails Oct. 2005
Tools: a good fine kerf razor saw, a miter box, a small square, sandpaper, a very sharp modeling knife, a good scale ruler, a fine marker (0.5 mm mechanical pencils are good), a pin vise and a set of drills, tweezers, files, and gluing weights are suggested. Glues: Walther’s Goo or some equivalent, Medium viscosity CA adhesive.
This structure is intended to be built convergently; you can build the platform and the station independently and then combine the two to finish. The advantage of working non-linearly is that while glue is setting on the platform, you can work on the station, and the converse.
There are many small parts & these are sorted into envelopes grouped by use or stage; larger parts are loose in the large bag. One envelope has the platform legs and diagonal bracing boards. The other glassine has the rafter ends and corner trim boards for the clapboard station siding; they are stained red on the ends. Glazing for the window and door is taped to the back of one of the clapboard wall pieces. I strongly recommend that the first thing you do is to sort out the parts and identify everything before starting. If desired, you could pre-stain everything to suit in advance; I use a complex mixture of Min-wax.
One other point - you do not have to follow these instructions to the letter - one of the main objectives is to let you build "your" station while also obtaining both experience and comfort with scratch building as close to board-by-board as can be done within the limitations of this clinic. You are free to change dimensions within the scope of the supplied materials!
The Platform: Construction begins with building a perimeter box frame. Working from Figure 1, assemble the framework as square as possible using a dab of Goo on the ends of each joist to tack them in place against the end sills. This is not intended to hold the framework together rigidly, but to just “tack” the parts into their relative positions. The joists and sills are all ¼” x 3/16” lumber; 4 long (29 ¾ ft) and 2 short (20 ft) joists and 3 end boards (14 ft, 9 ft, and 5 ft).
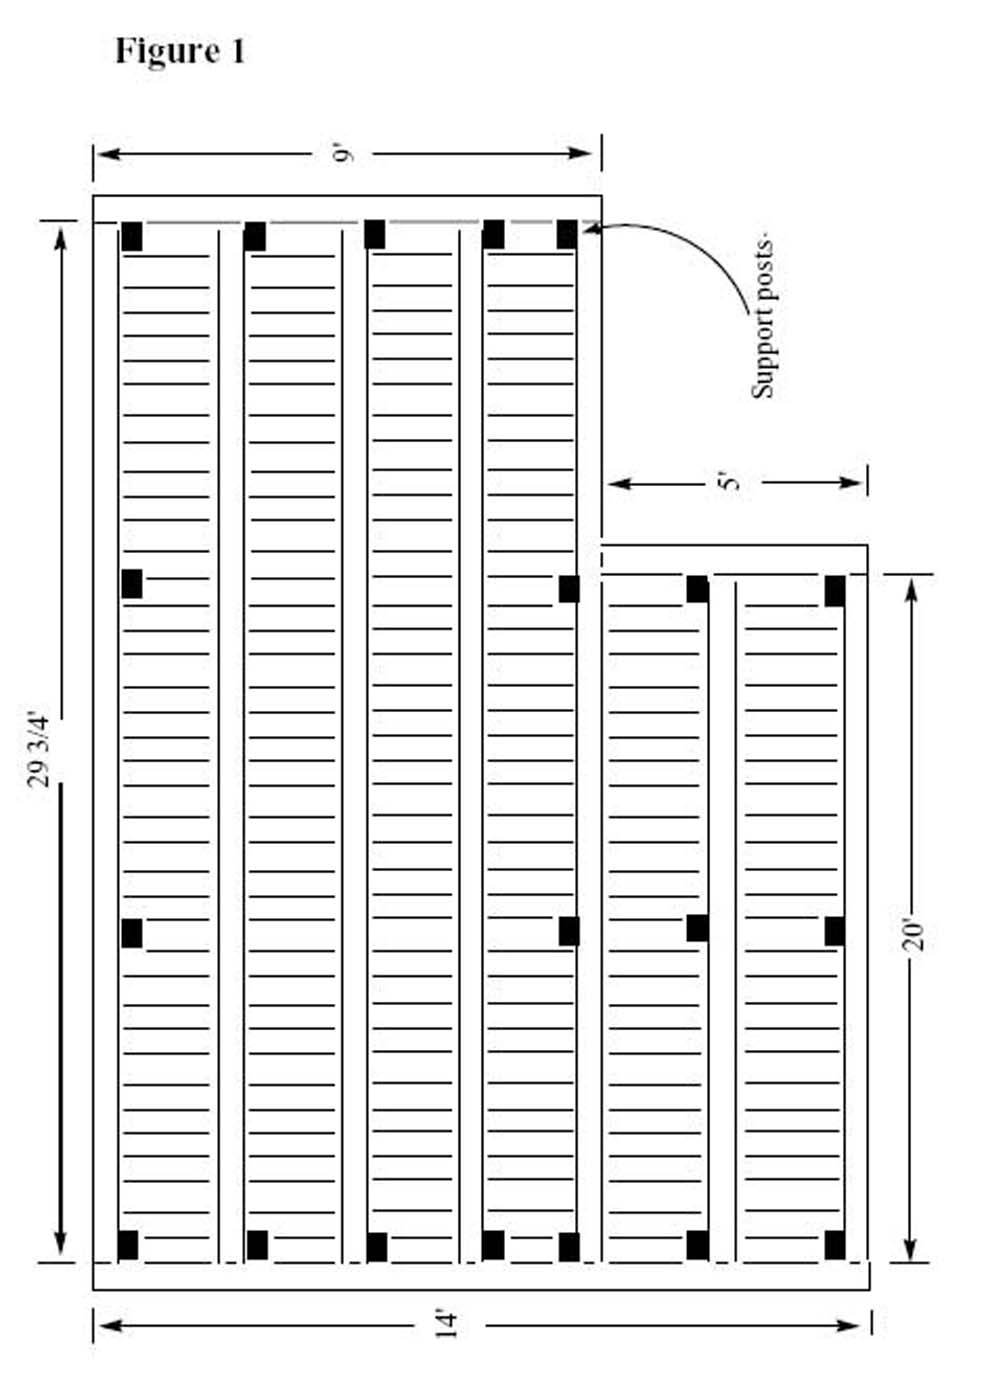
Decking: The deck boards are unstained individual boards. Odds are no one will look under your structure, but having some random widths and having an aged, worn surface adds character. There are at least 40 deck boards close the width of the platform. Set these flush on one side and prune the excess overhang later. Pick out ~ 4-6 nice straight deck boards and after laying down a bead of CA on the top of the end sill and down the joists for a distance of about ~3 deck boards, glue these down while keeping the frame square. This will "lock" in your joists and frame in place and in square, and let you finish installing the rest of the deck boards. Try to pick "interesting" boards; arrange for color patterns, grain, "knots", etc., to be visible. A little damage adds character, but also stay with straight boards. Avoid using seriously crooked or warped ones unless you are willing to match up complementary boards so things work out evenly. Trim the deck boards flush with the side sills. Save all of the extra pieces as they will be used to build your ramp.
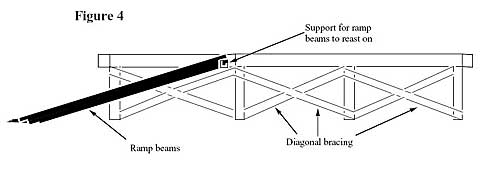
Legs: These are in one of the glassine envelopes; HO 8" x 12" cut 4½ scale feet long. The locations for these are marked out in Figure 1. Just CA them straight into place against the joists and sills using as many as you feel required. After finishing this step, add the HO 3" x 10" diagonal bracing (see Figure 4).
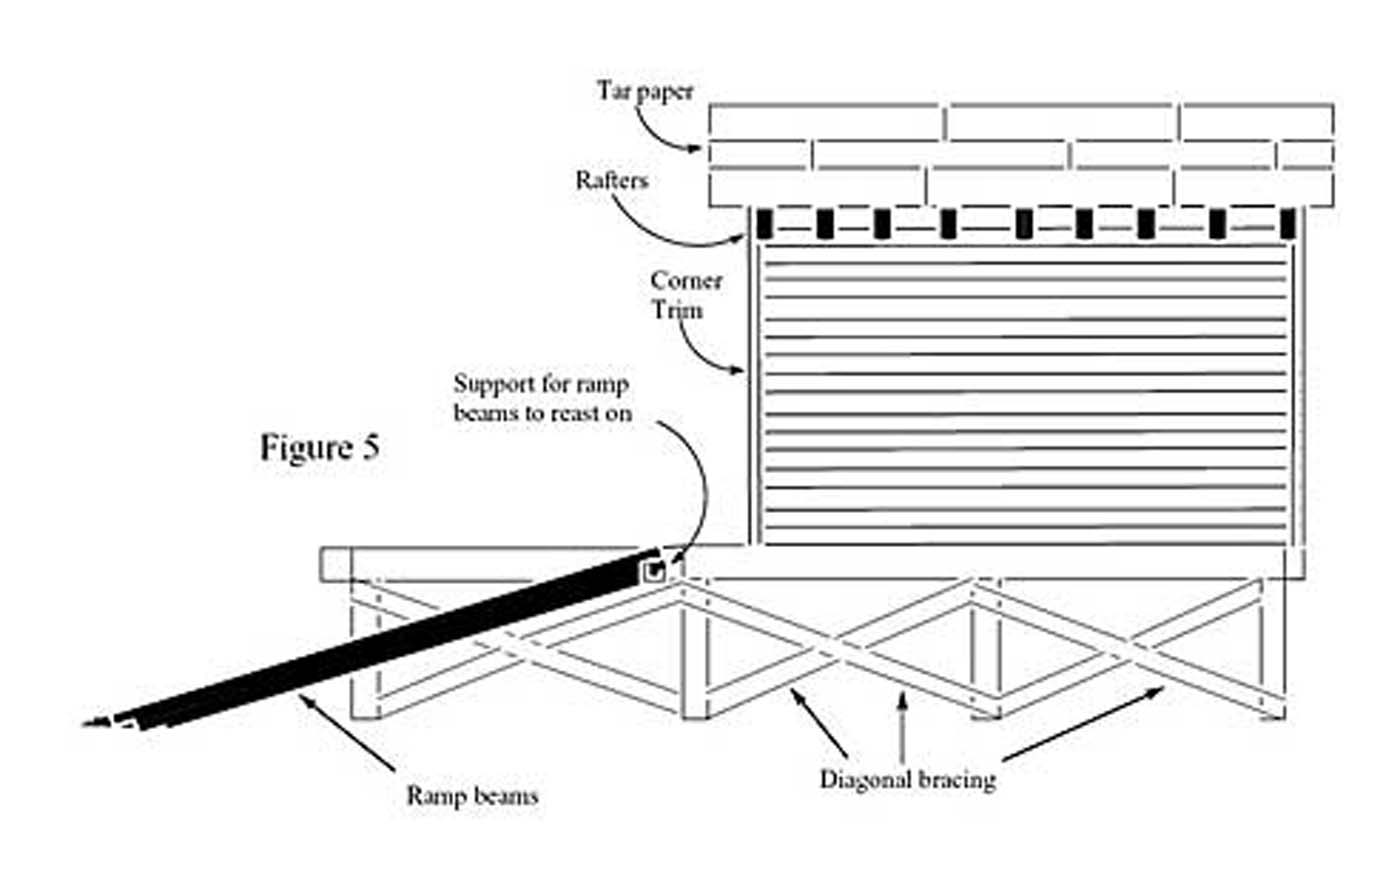
Ramp: There are 2 more pieces of ¼” x 3/16” lumber, cut to ~16’scale feet. Create the angles at each end by sanding and test fitting until satisfied. Glue a piece of scale 4” x 4” across the bottom of the platform end sill where the ramp joists will butt up against this beam for the ramp joists to rest on. Notch the ends of the ramp beams to accept this 4” x 4", glue them in place, and deck them over those leftover short pieces of decking boards. These will be delicate to trim, so take the time now to cut these boards close to correct length. Add the nbw castings (Grandt Line #23) to dress up the assembly where the legs are bolted in and now the platform assembly is complete.
The Station: Figure 2 shows the 4 walls of the station, freight office or storage shed. These two sides and two ends are pre-cut from 3/32" clapboard siding. One side and one end piece are taller since they will extend down over the side of the platform. Also, the ends appear to be too long and not to match their respective sides. Don't worry -- they
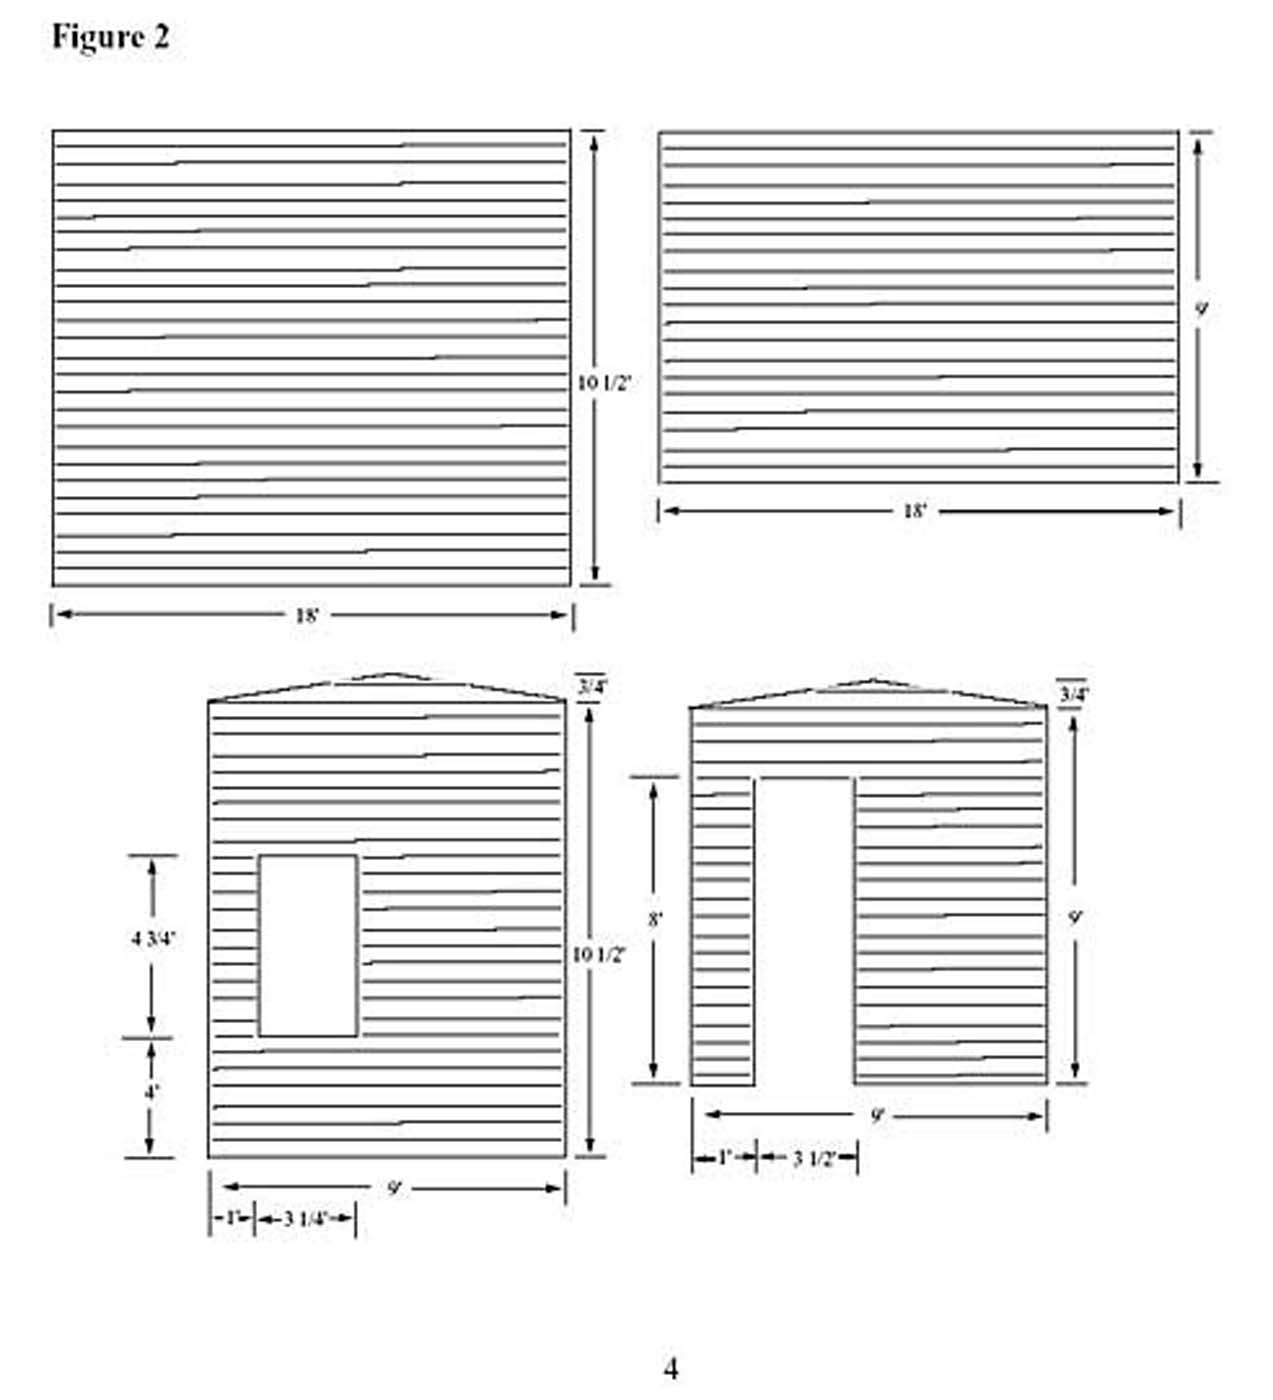
will after you cut the pitch for the roof. There is one window shown in the one end with the door at the opposite end. These can be moved to suit and that's up to you, the builder. First, each end needs to have the roof pitch cut into it. Find the center of each end and measure along the sides as in the figure and (very!) carefully cut these angles. Prior to cutting out the holes for the door and window, locate the (4) ~9 scale foot lengths of O scale 4" x 4" and glue one to each inside edges of each end wall measuring from the top down (See Figure 3). These serve two purposes. First, they stabilize the clapboard siding from splitting when you make cut outs for the door and window. Secondly, they provide a surface for gluing the sides to the ends when you assemble the structure. Run another length of O scale 4" x 4" along the base of the shorter side wall and end to provide an attachment site to the platform.

After completing this step, decide on your window and door locations. Mark their openings using the Grandt Line castings themselves as guides! The openings in the Figure 3 were derived from a Grandt Line 3707 window and a modified Grandt Line 3612 door and are not necessarily what has been supplied. Using a very sharp knife, repeatedly scribe a line until you can comfortably and accurately cut through the siding. Do not rush this! Even with the 4" x 4" reinforcing, the clapboard siding can crack or split. It's repairable with CA, but avoiding this is preferable. Test fit the castings in their corresponding openings and make "adjustments" with your knife as needed so that they fit snug & square, but not tight. This will let you paint the door and window cleanly and glaze both prior to their installation.
Now, to assemble the four walls carefully run a bead of glue on the one of the O scale 4" x 4" edges on the interior of the "door end" (9' high) and glue this to the "short wall" (9' high) making sure to carefully align the tops of the two pieces. Repeat this step gluing the "window end" (10 1/2' high) to the other end of the short wall aligned at the top. Try to get these joints as close as possible to 90o. Now, glue the "tall side wall" (10 1/2' high) to the two ends. Start with one end; get it carefully aligned at the top, and square, and then let the glue set up well. You can carefully pry and glue the other end of this wall to the remaining end wall.
The Roof: The roof is a quick, simple tarpaper roof. Glue the two pieces of 1/32" thick sheet basswood sheet (7' x 20' scale feet) over the office leaving a 1' scale foot overhang on the sides and a 6" scale overhand on the ends. Flip the station over and glue in false rafters (in the one glassine envelope) made of 1/16" x 5/32". Sand these to the correct bevel so that these sit snug up against the top clapboard, meeting the roof overhang, and extending out to near the edge of the roof. Start at each end and set these roughly at a scale 2 foot centering; this should come out with 9 rafters. Make sure your rafters line up on both sides! For tarpaper, peel & stick tarpaper is provided. This will have to be carefully cut out and some thought given to overlapping to cover the sub-roof effectively. Three rows for each side with a small overlap on the crown should cover the roof. You can cut a hole or surface mount the provided smoke jack at this point.
Trim Work: The two places that need trim work are the station corners and end fascia. The red stained HO 2" x 8" in the one glassine envelope is provided for this purpose. Cut these to length and glue into place.
Putting it together: Having completed the above steps, it's a simple matter to mount the building to the platform (see Figure 5). A bead of CA on the scale 4" x 4" lumber that you added at the base of the walls and to that portion of the walls that overlap the platform sides secures the building to the platform. If it's slightly out of square, this mounting to your square platform side will reconcile the building to the platform.
Painting & Finishing Suggestions: You should paint the door and window and glaze them prior to installation. I suggest using a Polly S paint for these and the smoke jack. I stained the entire building with Min-wax Pecan. I then took some very old Floquil Dark Green, diluted it with mineral spirits and with the cheapest brush available just spread this around until I got the coloration and depth that I wanted; darker under the eaves and protected spots and variably lighter to worn away everywhere else. Some streaking from the window paint was also added. The sills, joists, platform lags and braces were painted Polly S Oily Black. The smoke jack got a coat of Polly S Steam Black with a few touches and streaks of Roof Brown. After all this, the entire unit was given a light air-brushing with Grimy Black and Roof Brown.
You could, of course, do a complete interior with lighting and a removable roof, but the primary objective here is to build a simple, first structure that becomes the basis for future and more complex endeavors.
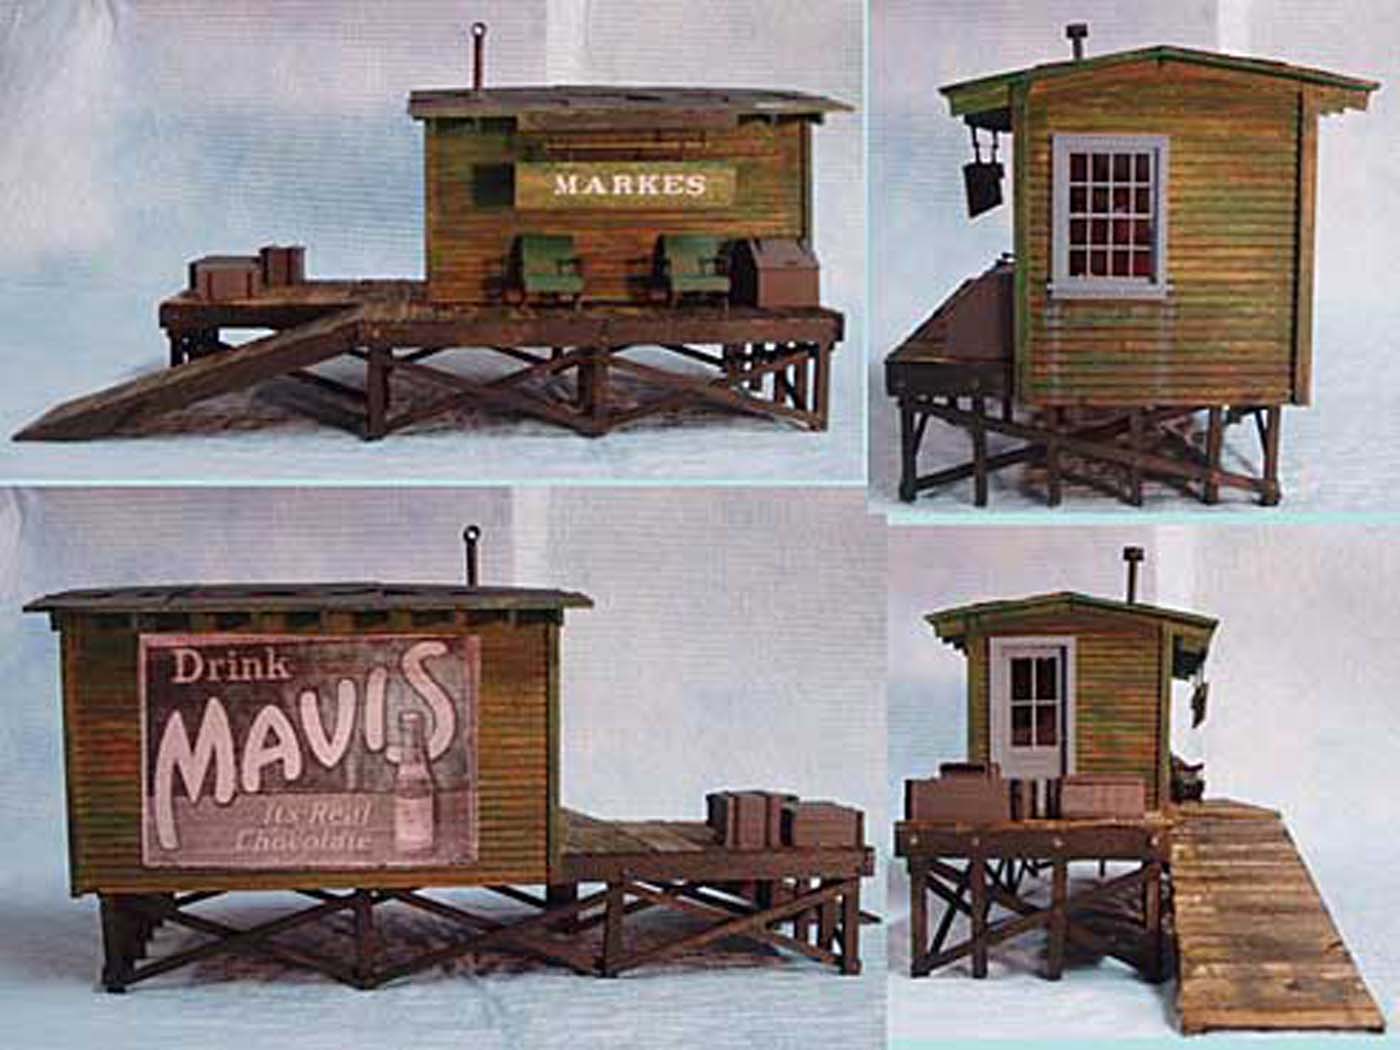
Here are some images of the finished Station
If you liked this tutorial you should check out the variety of tutorials located on the Potomac NMRA Clinics page.